
Welcome to another edition of the Stamp Review Crew. I’m the last one on the hop this time around, so you probably already know who we are. But in case you jumped in at the end, we’re an international group of Stampin’ Up demonstrators who get together twice a month to highlight a different SU stamp set.
This week we’re featuring the adorable No Bones About It stamp set. Where was this set 10-15 years ago when my boys were really into dinosaurs? Well, actually I wasn’t even stamping back then, but if I’d seen this set, I probably would have started. 🙂
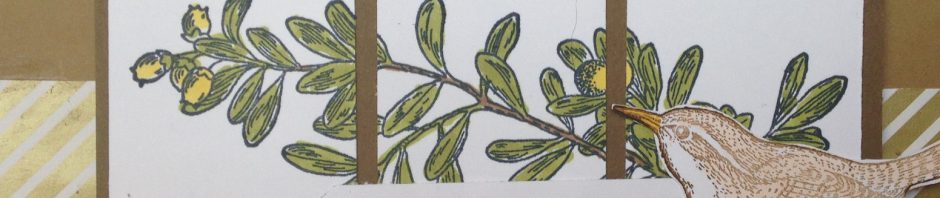
I love that this set includes the skeletons as well as the dinosaur shapes, but for my card, I wanted to create a dino-scene. I came across a tutorial for Bendi cards this week and decided it would be a fun way to display my dinosaurs.

A bendi card has two flaps with tabs that fit into slits to make a 3-D card. This allows you to have layers to create depth and dimension.
Here is the card with one flap open:

With both flaps open:

Just lay the flaps flat and the whole card will fit in an envelope. I went over the edges of the card quite a bit, so I’ll need a larger envelope, but if you stay within the dimensions of the card base, you’ll be able to fit it into a regular envelope.
Well that’s my project. I hope you like it. I think I kept herbivores together, so there will be no carnage going on here. I showed to my now-teenage dinosaur-loving son who informed me that “rawr” really means I love you in dinosaur. He googled it to prove it to me. Who comes up with these things?
You can move backwards in the hop to see what Tanya made or return to the beginning of the hop to view Heidi’s projects.


Oh my word, this card is amazing!! I love the scene you created! I think I need to make one of these cards!
My grandson would love this. You are so very clever and as usual inspire me to try something new.
Love it! This is the perfect idea for this set and it turned out amazing!! I’m getting lots of ideas on this hop myself!
Great scene, and Bendi card!! Great job fussy cutting 🙂
This set is perfect for a bendi card… and I love how you added trees from the punch. Great idea!
I love this card and perfect for my niece and nephew twins, but I don’t get the bendi thing at all. Is there a video somewhere to demo it?
Hi Judy – The first flap gets inserted into the card base, causing it to bend. The second flap is then inserted into the first flap. In the first picture, if you look closely you’ll see that the second flap is inserted to the right of the brontosaur (I think that’s what it is). In the last picture, you can see the slit where the first flap is inserted.
I used the tutorial on Splitcoast found here – http://www.splitcoaststampers.com/resources/tutorials/bendifold/. There are step-by-step pictures and a video which will make it easier to see how it’s being done.
This is out of this world amazing! The bendi card is so perfect for this set and I just love all the scenery you’ve created as well. Perfect!
Jess
Wow Nancy! Congratulations! This project is one of my most popular pins this week and is being highlighted on my blog today. Thanks for sharing. Kylie xx
Nancy, I think this is the best bendy card I have seen! It really works well to showcase the scene you have built! Congratulations on having it featured on Kylie’s blog!