Monday night we had our monthly club/class and made this cute little card in a box. Now there are plenty of tutorials on the internet on how to make these. I used the one on Splitcoaststampers.com as my starting point. However, that one leaves you with a larger card – about 6.5 x 4 I think. I worked with it a bit to come up with one that results in a standard A2 (5.5 x 4.25) card. My instructions with pictures are below. It looks like a lot of steps and it might seem complicated, but stick with me. This is really easy! Everyone at class the other night was really surprised at how quickly it went together. You will spend more time decorating your box than you will putting it together – I promise!
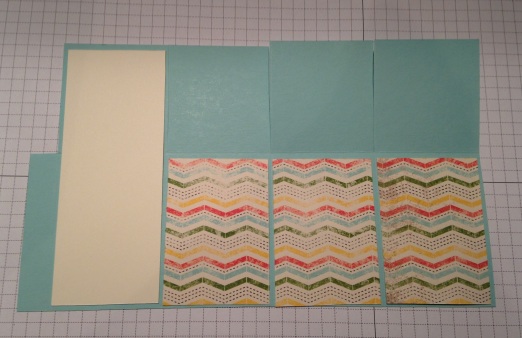
Begin by cutting a piece of card stock to 9 x 7 1/2. Place the card stock on a score tool on the 9 inch side and score at 2 1/8, 4 1/4, 6 3/8, and 8 1/2. Then flip the card 90 degrees and score at 3 inches. Next, trim 2 inches off the 7 1/2 inch side so that your paper is 9 x 5 1/2 inches. Make sure you have 3 inches on one side of your score line and 2 1/2 inches on the other side.
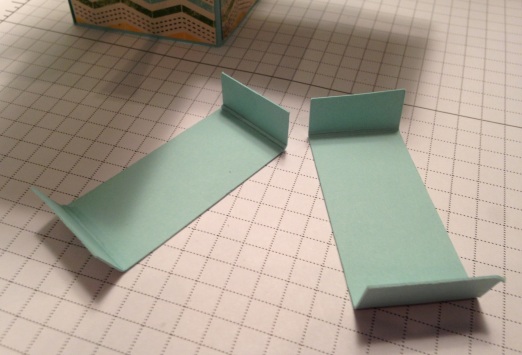
NOTE: Keep the piece you trimmed off. You’ll use this to make your brackets.
The 3 inch side is the box and the 2 1/2 inch side is the “lid” or box top. On the box top, you will cut down the score mark to the center score line for all the top sections. The small piece on the end gets cut off completely.

Now use a bone folder to crease the folds on the bottom half. Then decorate the bottom outside of the box. For this, you’ll need 3 strips of paper 2 x 2 7/8 and one piece that is 2 x 5 3/8 (this is for the back and where you would write your greeting).
You can also decorate the inside of the box, but I chose to only decorate the inside of the lid pieces. For this, you’ll need 4 pieces of paper that measure 2 x 2 3/8. Now fold your card into a box shape and glue at the tab. (I went out of order on this box and glued together before I put the decorative paper on.)
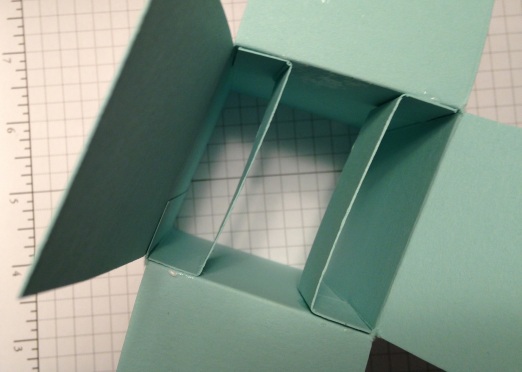
Remember the 2 inch piece you cut off your card stock? You’ll use this as cross pieces to support the inside of the box. You will also use these as surfaces to glue some of your decorations to. Anyway, trim the piece to 3 1/8 long and then cut in half so you have two pieces 1 x 3 1/8 each. Score each 1/2 inch from each end on each support piece.
Place one support at the top on the front end and glue into place. Then glue the other piece to the back of the top.
Now comes the fun part – time to decorate your box! You have six surfaces to decorate – the inside front of the box, the front and back of your front support, the front and back of your back support, and the back flap. You can also put decorations on the box flaps that fold out (see my butterfly on the front flap.).
I used the pansy punch and matching stamps, but I’ve also made a birthday card with cupcakes and balloons. You can find all kinds of cute ideas on Pinterest.
One last tip – I wanted to have some “floating” pieces. If you look closely, you’ll see my two butterflies. These are attached to thin strips of acetate and attached to the back sides of the supports with a dimensional. That keeps it from being smack up against the flowers and allows it to sway when the box is opened.
Here is a closer look:
I hope you’ll try one of your own. Leave comments if you have any questions. Here once more is a breakdown of the paper you need:
Base – 1 piece 9 x 7 1/2
Outside bottom – 3 pieces 2 x 2 7/8 (if you want to decorate the inside, you’ll need 4 more pieces of this size)
Inside top – 4 pieces 2 x 2 3/8 (again, if you want to decorate the inside, you’ll need 4 more pieces of this size)
Back – 1 piece 2 x 5 3/8


Beautiful card! Thanks for the tutorial.
Lesley
Pingback: Birthday Card in a Box » Rubber Stamping & Card Making with Yapha